What is Bored Piling (Wet Process)?
What is Bored Piling (Wet Process)?
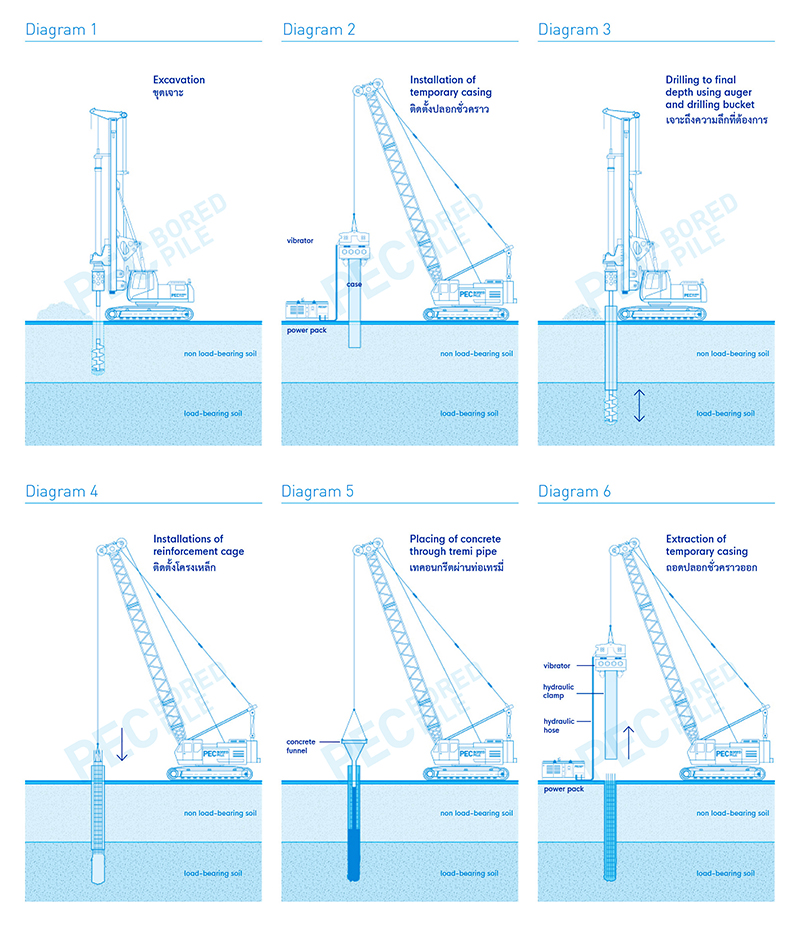
Bored piling is a method that involves boring a circular hole into the ground, installing steel reinforcement and filling the bore hole with concrete to form a pile. Boring is carried out to the design depth by means of either a crane mounted or a track mounted hydraulic drilling rigs.
The Process
- Installing Temporary Casing
Once the point of excavating is located, install the temporary casing by using the vibro hammer to push the casing into the ground. Check the horizontal distance from the center of each axis and keep the vertical distance error to no more than 1/100 of the distance of the pile. In cases where the soil is very stiff (such as places with little to no water) it may not need temporary casings at all.
Always check if the temporary casing is in the correct location by off-setting from the 2 points of axis using a ruler to measure from the casing if the offset number is correct.
- Excavating the Soil by Dry Process
Once the casing is installed at the proper point, use an auger to excavate into the dry soil, upon reaching wet soil add slurry to help maintain the hole’s integrity.
- Excavating the Soil by Wet Process
Change the drilling head to bucket type once excavating to high depth and add slurry to help maintain the hole’s integrity by always keeping the slurry filled over the existing ground. When the desired depth is reached, clean the hole’s bottom with a cleaning bucket until the bottom is levelled.
- Examine the Integrity of the Hole
After the bottom of the hole has been cleaned properly examine the hole’s actual depth by using a pendulum attached to a measuring tape and lowering into the hole to get the depth and check the if the hole’s bottom is levelled again.
- Inserting Reinforcement Cages to Prepare for Cementing
Check that the reinforcement cage sections are squared then weld the pieces together with an overlap distance of 40 times the diameter of the cage. Check the distance of concrete bolster that holds up the reinforcement case in place inside the trench.
- Installing Tremie Pipes
Lower the tremie pipes one by one into the reinforcement cage but leave a gap of 2-3 meters at the end of the pipe to the bottom of the trench, this will allow the concrete to flow into the trench freely. Then place a funnel at the top of the tremie pipe to avoid concrete spillage.
- Concreting
Before transferring concrete into the trench make sure to pour plug foam into the tremie first so there is a buffer between the slurry and the concrete. Once the concrete is poured into the trench the slurry will flow out automatically because it is replaced by the dense concrete mix. During concreting the tremie pipe must stay in the trench until concreting is completely finished and concreting must be done continuously. Once the volume of concrete in the trench increases the tremie pipe must be taken out but always leaving at least 2m or 3-5m depending on the situation at hand, until all the slurry has been replaced by concrete.
- Removing the Temporary Casing
When concreting is completed, remove the temporary casing with the vibro hammer before the concrete sets. During the removal process, always remove the case at a vertical angle to prevent the destruction of the trench’s wall. The next excavation point should be away from the previous trench 6 times the circumference of the pile and at least leave a 24hr. gap time.